
Friday, February 10, 2012
Monday, September 19, 2011

Friday, June 10, 2011
End Of Semester
1. Ensure that all 8 assignments listed below are complete.
2. Your final exam includes one print of one of your location shoots. This print must be matted and handed in with the three handouts that were provided for each photographic location.
3. All three locations photographs must be properly posted for your final mark.
4. Make sure that the instructor has checked you work and accepted your your as meeting the standards expressed in your notes and outcomes. It may be the case that you will be expected to repeat the assigment if the quality of the photo does not meet the expectations.
Thursday, June 2, 2011
Final test Available Light
Assignment no. 1 (portrait)
Backlight: This means that your subject is in the shadow and your light source is behind the subject. Appropriate compensation must be documented….changes that you are making to ensure good exposure in the fore ground.
Options: exposure adjustment, flash (fill), reflector, other….
Do not compensate in Photoshop.
Assignment 2 (portrait)
Low light situation…………..no flash…must compensate.
This is typically indoors with minimal light from a window source or artificial light.
Critical are the values in the shadow areas….must have details. Sharpness is critical.
What are the adjustments???
Assignment 3 (still life or portrait)
This is a depth of field and rule of thirds assignment.
Use both of these design elements to create an image that will have the center of interest at one of the intersections on the rule of thirds grid.
The focus must be sharp and the background must be soft focus.
What are the changes that you have to make on the camera and the lens???
How do you avoid camera shake?
Tuesday, May 31, 2011
Assignment 8 Backlight

 Find four locations that have a backlight condition. this means that the light source is behind the subject. Take an exposure with the normal or unadjusted setting and then take the same photograph with a conpensation of 1 & 2 spots. Post your best example on the blog. The example should have the first and the second exposures on the same post.
Wednesday, May 18, 2011
Assignment 7 Create Action


Before and after images of an actions that is saved in the Photoshop-Preset- Photoshop Actions folder. The above example is represents a change form a full colour RGB image into a Duotone image. This action can be saved and used on any photograph to obtain the exact same changes to the image.
The changes that you make on the photograph are global changes meaning that the changes that you make on the image will affect the entire image. Local changes that are unique to each image must be made after all the global changes are made.
Tuesday, May 10, 2011
Assignment 6 Determine Mood two pages

 Determining the mood from stock images purposes the concept that images can be manipulated to convey a predetermined mood. The above images were taken by students on an outdoor Ed. trip. these images were snapshots of the various trips that happened during the year. All together they represented a diverse range of activities with varing colour casts and environmental conditions. To group these images into a singular thematic mood, colour and Photoshop effects such as Channel Mixer were used to unify the mood of these trips. Together these manipulated images suggest a more singular intimate experience. Colour has been removed to limit the emotional effects of a wide colour range. Colour has been added to a limited extent and changing the RGB pixels cause a more dream like mood.
Assignment 4 Shoot to Script


A 'shoot to script' assignment is intended to help you previsualize and construct the photographic composition which has been predetermined by the graphic designer. Often the professional photographer is assigned a photographic assignment based on the limitations of the publication he or she is working for. This usually takes the form of a sketch or layout of the page and includes the distribution and placement of the images and type that makes up the page content. Your assignment has three sketches that you were given in class. From these notes you were asked to shoot these photographs in accordance to the specific limitations of the design layout.
The example below is a layout that is in the form of a spread ( a two page layout ). The photograph in the background provides the opportunity to place type in an area of the image tha is purposely out of focus. The image is shot with the rule of thirds in place. the sharp area of the image on the left provides content while the part of the image on the right is out of focus in order that type can be placed.
The example below is a layout that is in the form of a spread ( a two page layout ). The photograph in the background provides the opportunity to place type in an area of the image tha is purposely out of focus. The image is shot with the rule of thirds in place. the sharp area of the image on the left provides content while the part of the image on the right is out of focus in order that type can be placed.
Monday, May 2, 2011
Term 4 Marking
1. Depth of field & rule of thirds. ( portrait assignment)
2. Depth of field and rule of thirds still life. ( close up )
3. Research of artist photographer. ( includes example, bio, your impression and discussion regarding the aesthics involved.
4. Shoot to script assignment ( includes Indesign layout )
5. Long term of portfolio assignment ( contract and commitment to the subject )
6.Layout project - determining and defining mood from stock images ( Review Channel Mixer)
Thursday, April 28, 2011
Assignment 3 Artist Photographer Bio

Diane Arbus ( 1923 – 1971 )
Diane Arbus continues to be a controversial figure in the brief history of photography as an art form. She continues to have admirers and critics of her photographs. There are those who believe that she exploited the marginal in society, and depicted the elements of the human psyche that elicited shock and horror to enhance her own artistic career. Then, there are those who believe that she opened a view to the world of individuals that had not been seen and or appreciated. Whichever point of view one takes, her photographs remain controversial and a cornerstone in the development of photography as a 'fine art'. She has opened a door to human conditions that were culturally taboo and has initiated the visual exploration of the human experience that has now become acceptable and appreciated. Like so many individuals that pursue the act of taking photographs as a personal documentation, she has believed that she was taking photographs that no one else would.
Tuesday, April 26, 2011
Assignment 1 & 2 Depth of Field & Rule of Thirds


Using the depth of field to create empty space in the photograph is sometimes a useful and deliberate approach when page layout demands space to superimpose images of type. In the digital camera you must use the pre-focus on camera to create the proper focus. Remember that you camera will want to focus on the center of the image. Therefore, you must focus on your subject and then pre-focus, then turn the camera left or right to create the desired composition.
The depth of field assignment includes the following photos:
1. 3 portraits of rule of thirds and depth of field
2. 3 portraits of telephoto at max.... How close can you get to the subject with a wide open aperture and obtain a sharp image.
3. 6 photos of close ups use the wide open setting and determine you depth of field with stationary objects.
3. 6 photos of close ups use the wide open setting and determine you depth of field with stationary objects.
Assignment 5 Portfolio Assignment
At the close of this semester you will be expected to create a portfolio of your work. This portfolio will demonstrate your photographic and Photoshop skills and will also demonstrate a portfolio that has an aesthetic or consistant artistic theme or expression of an idea. You will create this portfolio in one of two methods. You may create a (min. 12 page photo book) such as advertised in London Drugs photo finishing or you may use a web site such as Wix to create you free web portfolio. A time frame will be given to you and you will be expected to provide you portfolio for the final exam process for this course.
Your portfolio can be of a more commercial oriented theme or it may be a more artistic or individual approach which demonstrates you artist vision or point of view. Consider the examples of portfolios that are provided in the link list to help you determine what is meant by an aesthetic approach.
Your portfolio can be of a more commercial oriented theme or it may be a more artistic or individual approach which demonstrates you artist vision or point of view. Consider the examples of portfolios that are provided in the link list to help you determine what is meant by an aesthetic approach.
Monday, April 4, 2011


End of term 3 assignment
At the end of term 3 students will be able to take a photograph in any available lighting condition. Difficult lighting conditions include low light, backlight and high contrast situations. Student will be able to present images taken under these conditions that have the proper image qualities such as a full historgram, complete protocols and all images must be sharp and able to maitain full detail in the important parts of the images. Students will present three images that are taken in the following light conditions: Low light indoor, high contrast indoor our outdoor and a photo taken with the light source behind the subject. Student will sketch the scene and provide the appropriate camera information including ISO, and f:stop, shutter speed and focal lenth of the lens. Term four begins with depth of field theory, shutter speed priority and compositional consideration within the photo frame. Also we will be working photo presentation formats and the completion of a printed photo portfolio book. Also, you will be expected to have completed the seven design/composition photos which should be posted.
Monday, March 7, 2011
Protocols (starters)
First steps in cleaning up your digital images
Global changes
- Levels – value changes
- Colour balance
- Contrast / brightness
- Cropping
- Check against neutral background
- Adjust sharpen
- Use lens distortion if required
Local changes
- Dodge and burn
- Quick mask – blur
Mode change? Options include: greyscale, duotone, index colour, halftone etc.

Before and After Protocols


The top image is one that has not been altered. The image below has been altered using the series of protocols to cleanup and enhance the composition. Also, we used the technique of several layers that had been adjusted and then earse the layers that we did not wish to be visible. Using several photoshop layers with spicific characteristics such as saturation, contrat, blur etc. we can intuitively add and subtract the qualities we desire.
After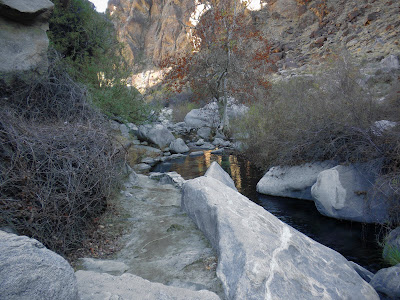 Before
 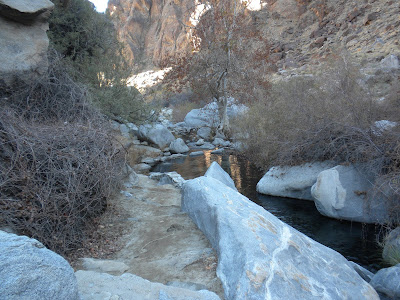 These two images are before and after photoshop has been used. The first image has been altered to specically repair image colour in the shadow and highlight areas of the photograph. It still looks realistic without the blue shadow casts removed. Essentially, photos that have interest in the shadows and in the highlight ares may need to be adjusted to compensate for the limited tonal range of the camera.
 Before
  These two images are before and after photoshop has been used. The first image has been altered to specically repair image colour in the shadow and highlight areas of the photograph. It still looks realistic without the blue shadow casts removed. Essentially, photos that have interest in the shadows and in the highlight ares may need to be adjusted to compensate for the limited tonal range of the camera.
Wednesday, February 23, 2011
Light source and contrast


Top image photographed in sunny day with window.
Bottom image photographed in cloudy day with same window.
None of these images were altered and illustrate the different qualities of light on a day to day basis. In both cases these photographs tonal range could be improved.
Greenscreen

Your green screen assignment can begin with an image that you have selected and wish to replicate in the studio or it can begin with an image that is the background. if you choose to use the background image first, you must think about how the lighting will match the lighting in the scene that you have selected. The goal of this assignment is to make you sensitive to the kind of light that is required to make a close match to the forground and the background. Using photoshop manipulations can assist you in making the match more realistic
Subscribe to:
Posts (Atom)